Its been over a year since have written anything more than a facebook update. I have missed it, longed for it and have recently found myself needing to write again. I had stopped blogging when we unexpectedly bought a feed store. I soon after started writing for the Berthoud Surveyor, a small paper in a small town of Northern Colorado. Now a year has passed and countless things have changed, except my love for writing. So here I am, back again where I always find myself...picking up where I left off after many distractions.
What this all means is that life is starting to settle down again, feeling normal and like we are home. This time last December we purged our belongings and everything that was left got packed in the biggest Uhaul we could get our hands on to head South. We left northern Colorado during the first snow for sunny the Texas Hill Country. It was all a blessed plan from the man upstairs because we rented a beautiful house from 2 states away and signed an 18 month lease. The opportunity came up the same day we were supposed to sign a lease for an apartment. Though we didn't want a long lease at all it made sense for the kids school schedules to have our lease end in summer. Six months later (SUMMER) the landlord calls and says they are moving back to Texas and would love to move back into their family home if we would be interested in ending our lease early. WHAT...literally the day after we accepted an offer on our home in Colorado. So six months in to Texas life we bought a house, moved in and 20 days later had a baby named Emmet.
Now it has been a full year and we are making friends, learning street names and have favorite places to eat. Our son for the first time can walk down the block and ask his friends to play ball. We are all finding happiness here and looking forward to what this next year will bring our family.
Saturday, December 3, 2016
Wednesday, September 3, 2014
Canta Chicken Get Alope
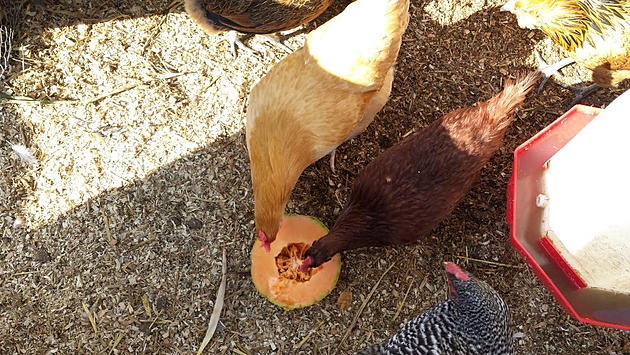
It is summer and Berthoud and the surrounding areas are buzzing with fresh everything. Many of us here in Berthoud keep a flock of chickens whether for eggs or meat, business or hobby they are everywhere here from farms to apartments. Some are keeping them for the fist time and others were raised butchering their birds themselves. Either way Summer is my favorite time to enjoy having a flock of our own. I love watching them peck around the yard, having my kids collect fresh eggs on a daily basis and seeing the spring's hatch-lings grown into hens. With all the fresh produce from our garden and the markets we visit there are always plenty of fresh table scraps that make it to the girls. And in my opinion into the eggs making them that much better. Their all time favorites seem to be melons and this morning they were lucky enough to get a whole cantaloupe to themselves. Out of our small 13 bird flock I was really able to tell which hens rule the roost. An easy way of telling is to see who gets the food first, and funny enough it was this spring's babies who endured evil Mrs Silky's rigorous and down right mean bullying who have now scratched, plucked and pecked their way to the top. Though Mrs. Silky is the matron ruler of her roost these girls have come alone way. I love watching this aspect of Coop life, who is mother hen and who is at the bottom of the pecking order. Size doesn’t matter, wit is neither here nor there it is all about sass and the will to rule the roost. I don't know maybe I can relate...wait did I just call myself witless? If you are new to chicken ownership and have yet to feed table scraps have at it! Your flock will love you all the more. Remember always avoid avocados as chickens can NOT eat them. They don't really enjoy peppers or citrus either, at least none of the birds we have ever had do. Summer is almost come and gone so soak it up!

Sunday, December 8, 2013
Faux Fancy
I recently took on the biggest DIY ever! I hand painted an 800 square foot concrete floor and made it look like wood! Most of you know that this past June we moved into our new home and the carpet HAD TO GO!! It stunk and we decided to pull it up. Luckily in our daughters room there was beautiful wood floor so all we had to do was seal it. Unfortunately on our lower level it was all grey uky concrete. The ideas were more carpet (but with 3 small kids seemed stupid) wood floor (after buying a house seemed uhhhh expensive) and paint (which seemed ghetto). But wait a minute I thought...we can faux paint it to look like wood!! OH yeah and by we I meant me, my husband pays the bills and I do the house work and make bills for him to pay 8D
Ok so here we go, we started off with ripping out the carpet, ugh yuk disgusting!! Tip for home buying bring a black light and shine it on the carpet...seriously! After taking out the tack board that was attached to the concrete via huge nail we had to patch the holes, when I see we I mean my hubster. Then we sanded all the rough spots to ensure a smooth floor. At this point I start looking around and thinking if I am going to paint the floor we may as well paint the walls duhhhh (but this is a post about the floors so I digress)! So we went form dark walls and light flooring to dark flooring and light walls, just the way uh ha uh ha I like it! UH HA. Then I vacuumed and mopped the floor until it was sparkling clean clean clean. The plaint will NOT stick if there is dirt on the floor.
 AFTER
AFTER


Ok so here we go, we started off with ripping out the carpet, ugh yuk disgusting!! Tip for home buying bring a black light and shine it on the carpet...seriously! After taking out the tack board that was attached to the concrete via huge nail we had to patch the holes, when I see we I mean my hubster. Then we sanded all the rough spots to ensure a smooth floor. At this point I start looking around and thinking if I am going to paint the floor we may as well paint the walls duhhhh (but this is a post about the floors so I digress)! So we went form dark walls and light flooring to dark flooring and light walls, just the way uh ha uh ha I like it! UH HA. Then I vacuumed and mopped the floor until it was sparkling clean clean clean. The plaint will NOT stick if there is dirt on the floor.
BEFORE

 AFTER
AFTER
Here are all the tools you will need from start to finish for the floor
Concrete Paint in a yellow hue of your choice (amount depends on SQFT) I used soft butter
Semi Gloss Brown paint hue of your choice I used Glidden Breakfast Blend
Faux Glaze
Polyerithain to seal the finished floor
As far as the paint colors go I strongly suggest getting sample colors of the yellow and brown to ensure you like the color it makes. A great idea would be to get a piece of plywood and practincing the technique from start to finish to ensure you are comfortable with the wood graining technique.
1 paint brush (to get paint right up against walls)
1 paint brush (for dry brushing wood look)
1 Martha Stewart wood graining brush (found mine at Home Depot)
1 wood graining tool (found my Martha Stewart version at Home Depot)
2 large paint rollers (1 for the base coat, 1 for the the sealer)
1 Small detail roller ( for your brown paint mixture and making a plank illusion)
A roller extension stick (a broom stick will work)
Now the technique is pretty simple just time consuming. Paint the whole base with two coats and allow to dry properly 24 hours is optimal.
Next you are going to paint "plank by plank" you will start with mixing your brown paint and your glaze according to the brand of glaze you bought. The glaze additive as opposed to just paint is going to add depth and color to your wood look. Using your detail roller create a plank by painting in one direction and not altering the pressure you are applying to the roller. Now it is going to look like one long solid plank of brown. Now you can take the Martha Stewart brush and LIGHTLY brush the paint staying inside the "plank" you have created, this will make the look of the little lines you see in wood. Next step is to use your wood graining tool buy dragging and rocking it from top to bottom of the faux plank. Finally use the dry paint bush to lightly go over the plank while to paint is still damp to give it a more natural look.
I will tell you I tried doing this with pinstripping tape to make the planks look distinct and it looked terrible and was Way Way time cosuming so that was a big bummer but it was a great lesson for me. I'm telling you this in case you get the same idea...stop turn around and just follow the instructions above.
Now start with your next plank getting the paint right up next to the previous plank, this is what is going to give your floor a more natural planking look. Make each plank longer or shorter than the one it is next to. Repeat over and over until your floor is done. Can you do it with out creating and painting individual planks? Yes but it will NOT look as good. Trust me, it is much more time consuming but necessary for a true faux look full of depth and texture.
Allow the entire floor to dry 24-48 hours before sealing with poly. Oh yeah and the poly stinks to high heaven so wear a mask and if taping off the room is possible to save the air in the rest of the house by all means do it! Give it two thick coats and allow to dry according the manufacturers directions. Do not attempt to clean with harsh chemicals the first 30 days. After that I still recommend using a light cleaner or dish soap when mopping. I am so happy with the look of my floor and I can not tell you how many compliments we have gotten on the look of our floor!! Happy Painting DIYers

Colors before I started were definitely not my style.

The concrete we had to work with post carpet removal and patching.

Half way there, getting ready to clean floor and paint it.

Concrete after it was painted with CONCRETE Paint, Don't try to save money here and use regular house paint. BIG NO NO! Soft Butta Baby

Plank by Plank people!

We also opted to paint the base boards so we took them off since we were painting the floors and walls and painted them while they were off.

Door used to be forest green now vintage teal. All the house paint I used was Glidden, it is great durable paint that you can get with primer already apart of the paint giving it a nice thick coat. This door is a great example because it was a dark forest green and only needed on coat to cover with this amazing shade of teal.
TAHDAHHHHH! Family room finished and we L. O. V. E. it!
Wednesday, November 27, 2013
Giving Thanks
Tomorrow my family will celebrate our first Thanksgiving in our home. This year has been full of changes and immeasurable blessings. Since September of 2012 we have welcomed so many changes in our lives; we moved to Colorado, added to our family, bought a house, have found a church that we all love and have met many amazing people along the way. Though moving to Colorado meant leaving our family behind for a place where we knew no one we had each other and we knew it was the right thing to do. We worked and prayed for a very long time before my husband found this new position. What is funny is Colorado was not even on our radar for places we would be willing to/want to move to. Now one year later I can't imagine living any place else! We have so much to give thanks for and we try to do that and teach our children to do that on a daily basis because thanks is not something that should only be given once a year. So tomorrow will be another first for us, Thanksgiving in our new home! Cooking, starting our own traditions and making memories that will last us a life time. Reflecting on all that we have to be thankful for such as our marriage, our healthy children and everything that has led us to where we are today will be the theme for tomorrow. For us we know we would be lost with out our lord who has blessed us with EVERYTHING we have and for that we are SO THANKFUL!


We truly have a VERY Blessed Little Nest <3
Tuesday, September 10, 2013
An Egg A Day
We got an egg, We got an egg, We got an egg hey hey hey hey (singing out loud and shaking booty)! Our little chickies (Cherry, Berry and Peaches) have become women, at least one has! Funny enough it is the smallest, yet loudest hen of all that has started laying the cutest most tasty little eggs you have ever seen. Against my husband advice I choose bantam hens for our new back yard flock last April because they were So So cute. They were just hatch lings when we bought them and have grown it to very pretty, amusing and as it turns out not so unpractical hens. Finally after months of waiting it happened, one of our girls laid her first egg and it is beautiful! Think robins egg blue meets sea foam and BOOM that is what sweet little Cherry laid. It is the smallest egg we have ever seen (from a chicken) and just the perfect size for our little Mia to eat for breakfast. There is a very rewarding aspect to producing your own food, or nurturing the animals that produce the food for you...I did't lay they egg so I can't take full credit .But watching your kids go out to fetch the egg that they will eat for breakfast is a great feeling. Try it...really it is totally fulfilling and exciting for everyone. If there are no restrictions in your neighborhood/town about keeping poultry you really should consider keeping a small flock or a huge brood for sustainable food production for your family. People pay small fortunes for organic cage free eggs and knowing your food is the bounty of a happy healthy animal makes it even better! I know what your thinking...keeping live stock is for a country bumpkin and hill billies (my view on suburban farmers just a few years ago) but times are changing as is my outlook and back yard chickens and suburban farming is the thing to do with rising food costs and the urge to eat a more natural diet it is the obvious choice. Not so long ago it was expected for a US citizen to do their duty to contribute to their own food consumption by keeping at least two hens per person in the house hold...okay so it was a long time ago but it is still a great idea. As of today we have had 3 eggs (1 egg per day) from the sweet little loud mouth Cherry and keeping our fingers crossed that the other two are in fact hens and will be laying any day now!
Cherry
.jpg)
.jpg)

.jpg)

From our BLEST little nest
Cherry
Advertisement from 1918
Tuesday, June 18, 2013
From the Garden to the Pie
This fathers day I decided to make my husband his favorite pie strawberry rhubarb from scratch, Ok almost scratch. Our neighbor happens to have a rhubarb jungle in her back yard and she kindly allowed my to harvest some for my experiment. If you have never had rhubarb ask your grandpa about it, he is probably the only person you know who eats it. After tasting the rhubarb raw, holy bitterness Batman, I thought I should add some strawberries to the mix to ensure our taste buds would do the happy dance and my efforts wouldn't be wasted. The ingredients list is short, the prep time is quick and pie time was delish!

All you will need is...
4 cups chopped rhubarb (I substituted 2 cups strawberries)
1 1/3 cup sugar
6 TBS flour
1TBS butter
Two 9 inch pie crusts and of course a pie tin. ( maybe next time I'll get fancy and make the pie crust myself)
 Start by heating your oven to 450°. Follow the directions on the pie crust packaging for the bottom of your pie, I had to cook the bottom crust for 10 minutes by its self. While the pie crust was cooking I chopped up my strawberries and rhubarb and mixed them together, and in a separate bowl whisk together the flour and sugar. Once the crust was done cooking and removed from the oven I put 1/4 of the sugar flour mixture on the bottom of the pie. Next I dumped the fruit mixture in and covered that with the remaining flour and sugar. Now cut the butter into little pieces and cover the flour and sugar mixture with it followed by the top pie crust. My edges came out horrible so I won't even get into how I did that but if you know how to make it look pretty power to you and please comment with your pointers!
(note: This recipe only makes one pie, I doubled up. See how pretty my crust was supposed to look?)
Finally put a couple of slits on the top of your pie crust and pop into a preheated 450° oven for ten minutes on the bottom rack. I placed my pie on a cookie sheet and I am so glad I did because there was a little bit of boil over. Cook at 450° for 10 minutes then lower your oven to 350 and cook for 40 to 45 additional minutes. Serve hot with ice cream or cold with coffee, either way it's delicious! Now you know why your grandpa loves rhubarb so much! As an afterthought had I decided to only use rhubarb and not add strawberries the pie still would have been delish. So have fun and experiment by adding your favorite fruit for another layer a flavor.

Saturday, June 15, 2013
Scentsy
Watch out flame-less candle, move over glade plug in Scentsy is here and it is Amazing! My neighbor is our tiny little town's only representative for Scentsy and you can find her at every town event, tent pitched and ready to sell you your newest addiction! The scent options are plentiful and the decor options are endless, it can be so hard to choose (patting myself on the back) I totally made a choice and am loving the way my house smells not to mention the added pop of color in the kitchen. Oh yeah that's right I said house, our whole house smells of blueberry cheesecake (I am aroma dieting i.e. just smelling the good stuff). Perks...your kids can't burn themselves since it is flame less, no worries about burning down the house if you forget to "blow it out" or unplug it whatevs, tons of decor options, and the wax is made in the good Old U.S. of A! So if you have a local representative in your area awesome, if not visit Jamie Flint's website to order the most delicious smelling home decor ever! In case you are interested I choose Blueberry Cheesecake, Sticky Cinnamon Bun and Welcome Home and I would recommend any of them.


Monday, June 10, 2013
9 Tips to Make Moving Easy
Moving is a pain...a huge pain but I have a few tips after our most recent and hopefully LAST TIME EVER move that helped make things a bit easier!

1st of all start Early, as soon as we put an offer in on our home and it was accepted we started packing one room at a time, cleaning the rooms and shutting them as we went this way we didn't have a big cleaning job at the end.
2nd we used very few cardboard boxes and used a ton of big plastic Tupperware that I had left over from my old Evermore Style clothing days. This allowed me to fit a ton of stuff in one container instead of 3 or 4 boxes.
 3rd, packing clothes was super easy with this tip I found on Pinterest! Take a large garbage bag and put your clothes in it (still on the hanger in your closet) cinch tightly at the top to allow for easy moving from your old closet to the new one! Just remove the bag once hung in the new closet and VOILA!

4th When packing glass plates place a paper plate between each on for added padding.
5th Change your address, utilities and all other bills to your new address ASAP so you don't get caught up in the move and wait to long. The companies will date it for your anticipated move date ahead of time.
6th We bought our own carpet shampooer instead of having someone else come do it, it was cheaper to buy a good Carpet Steamer instead of having two houses cleaned. This will definitely pay for it self because our carpet is white and we have 3 kiddos!
7th As you bring boxes in the house put them in the rooms their contents will go in.
8th Hope you have good friends to help you, if it wasn't for our's I am not sure how long it would have taken us to load and unload the truck with a baby strapped to my chest and my husband having to man handle all the heavy lifting alone. Thank you Russ and Megan!
9...Last but not least...Do not let moving stress you out, remember when all is said and done how worth it the whole thing is. Its a happy time so enjoy taking your time setting up and decorating you new home and have fun!

1st of all start Early, as soon as we put an offer in on our home and it was accepted we started packing one room at a time, cleaning the rooms and shutting them as we went this way we didn't have a big cleaning job at the end.
2nd we used very few cardboard boxes and used a ton of big plastic Tupperware that I had left over from my old Evermore Style clothing days. This allowed me to fit a ton of stuff in one container instead of 3 or 4 boxes.
4th When packing glass plates place a paper plate between each on for added padding.
5th Change your address, utilities and all other bills to your new address ASAP so you don't get caught up in the move and wait to long. The companies will date it for your anticipated move date ahead of time.
6th We bought our own carpet shampooer instead of having someone else come do it, it was cheaper to buy a good Carpet Steamer instead of having two houses cleaned. This will definitely pay for it self because our carpet is white and we have 3 kiddos!
7th As you bring boxes in the house put them in the rooms their contents will go in.
8th Hope you have good friends to help you, if it wasn't for our's I am not sure how long it would have taken us to load and unload the truck with a baby strapped to my chest and my husband having to man handle all the heavy lifting alone. Thank you Russ and Megan!
9...Last but not least...Do not let moving stress you out, remember when all is said and done how worth it the whole thing is. Its a happy time so enjoy taking your time setting up and decorating you new home and have fun!
Friday, February 22, 2013
HUGE DIY
I recently started on a huge project, after six days I am only halfway done but I am totally fine with that! When I am doing a project like this it gives me time to clear my mind... some people do yoga, I DIY!
I am revamping a dinning room set (table, chairs and china cabinet) to create a fun, family friendly, kid proof decorum in our dinning area! We had a way to big for our space but very nicely built dinning table about a week ago that I planned on fixing up...but plans changed, and this is why.
Fist I should tell you that on Friday I purchased a new fabric to reupholster our chairs so that they would be water/stain proof to our very cute but extremely grody kids! Sunday our neighbor decided to put their dinning set on the curb with a sign screaming FREE!! I had not yet reupholstered our old chairs so I had the fabric to do the "new" set. Of course I had instant visions of paint and sand paper and brushes and DIY ME dancing in my head. So Monday I went to Home Depot (My hardware store of choice) and picked out my colors with the help of their very knowledgeable and patient associate. My husband and I had decided that we wanted something that was creative, would look good in our kitchen, would add color to our home, could be enjoyed by our kids and also something that they couldn't bring to complete devastation So something that was made to look weathered, old and beat up on purpose would be PERFECT!! We also liked the idea of chalk board paint which we saw on our neighbors doors...So Cool!! We opted for a chalk board table top to go with the kid friendly table we had in mind. Now the table that we picked up for free had a serious coat of shellac on it making sanding and cleaning it very important if we wanted the paint to stick, which DUH we did!
So we (when I say we, I mean I) sanded, cleaned, prepped and painted and what was great about the whole distress look was that I could paint and not worry if the paint was coating evenly or if I missed a spot, AWESOME! However as I said I am only halfway done with this DIY so here is part one of two.
Here is what the table and chairs looked like before, I forgot to take a picture of the table top...must have inhaled a wee bit to much of the denatured alcohol!

A quick comparison

The stuff you will need.
Number 1 most important Dentured Alcohol is a great cleaner and removes SHELLAC whick made prepping the furniture super easy! BUT if your furniture is coated in varnish or lacquer than you will need a different type of removal/stripping product, talk to home depot about which product will work best for you. If you are not sure what is on your table you will need to do some experimenting.
Remember the base paint of a faux glaze project should always be lighter than the color you are adding to your glaze. I choose an off white called Victorian Linen for my base and a deep green to add to my glaze (Colors we chose based on the fabric that I already had). If you are only using a quart of glaze you can buy a sample paint jar, the paint to glaze portions are perfect! If you plan on reupholstering you will need fabric but you already knew that! We used outdoor fabric because it's water/stain proof AKA kid proof!

To remove the old upholstery I used a flat head screwdriver and diagonal cutting pliers. Measured the correct amount of fabric prior to cutting then used a heavy duty stapler to attach the new fabric. I know my husband loves when I use his tools in new and creative ways! Maybe one of these day's I will get my very own tool box...pink please!

After sanding, painting, glazing, upholstering and all that fun (and I do mean FUN) stuff we put it all back together, and when I say we I mean my husband! That's how all of our projects work which works for us :)

When you are all done make sure to let your chalk board paint cure for 3 days (which mine is still doing) before "conditioning" it with chalk! I love this it makes our home feel so much warmer and happier!
Part two will be coming soon! Oh and PS I had some extra material left over so I get a little bonus project...Yippeeee!
Thursday, February 14, 2013
DIY Valentines For Kids
This year my awesomely artsy 5 year old decided she wanted to make her own valentines for her class mates. She thought it would be more fun and special...smart girl! So we settled on flowers made of construction paper shaped into hearts and tootsie pops. The project was super simple and very cute, just cut the paper into small heart shapes (you will need 4 for each flower) and glue them together we also cute out some green leaves just "to make sure the kids know they are flowers". Once glued together poke a whole in the middle and stick a tootsie pop through the center and Voila...a cute little flower! Warning you may need a sharp object for the final step do adult help is definitely needed.


Tuesday, February 12, 2013
Love Day Breakfast
In our house we do something for every holiday whether it is Valentines Day Sweets or Saint Patrick's Day fun trying to catch a leprechaun we always make it an event for our kids! This year I am going to be serving Crepes for breakfast. Last week we read a book to our kiddos called Suzette's Crepes and they really wanted to try them. Though I am not making Crepe Suzette (history and recipe here) which is much more "fancy" I will indulge their curiosity with a basic crepe filled with whipping cream and fruit. My kids may not be world travelers but they are worldly foodies!
This recipe is so simple and people always assume you went out of your way to make them or that your some kind of wiz in the kitchen...we'll just let them keep thinking that ;)

This recipe is so simple and people always assume you went out of your way to make them or that your some kind of wiz in the kitchen...we'll just let them keep thinking that ;)
Here is what you will need, I am guessing you probably have it all in your kitchen right now!
Dry Ingredients
1 Cup Flour
1 tsp Salt
Wet Ingredients
2 Eggs
1/2 Cup Milk
1/2 Cup Water
2 Tbs Melted Butter
First grease your griddle or pan and start warming it on medium heat. Also preheat your oven to it's warmer setting.
Now start mixing the flour and eggs in a large bowl, slowly add in the milk and water, mix well. Finally add the salt and melted butter and beat the mixture until it is completely smooth.
Pour about 1/4 Cup of the mixture on to your pan, move the pan in a circular motion to spread out the mixture so it is thin and circular. Cook for about 2 minutes or until the under side is golden then flip and repeat on the other side. As each crepe is done put on a dish in your warmed oven because crepes are a dish best served warm!
Top each crepe with whipping cream and your favorite fresh fruit (I recommend using berries) roll it up and enjoy!

Thursday, February 7, 2013
Rustic Apple Banana Bread
I love baking from scratch and everyone in the house enjoys it too! Whether acting as assistant chef or taste tester the whole fam is involved...and happy! We eat a ton of fresh fruit in our house but once in a while things start to go bad before we get to them, in this case it was our bananas. Not wanting to waste anything, and not having quit enough bananas for regular banana bread I decided to make a variation of my mama's banana walnut bread. My banana bread doesn't have walnuts and does have APPLES...well apple sauce for moisture!!
 Bake for 45 minutes. I like to bake it for 42 minutes then remove the pan from the oven but allow the bread to continue to cook for the remaining three minutes. If you opt to cook your bread the whole 45 minutes in the oven remove the bread from the pan immediately and place on a cooling rack.


Ingredients Needed
Dry
1/4 Cup Sugar
1 1/2 Cups Flour
1 tsp Baking Powder
1/2 tsp Baking Soda
1/2 tsp Salt
Wet
2 Eggs
1/4 Cup Shortening
2 Soft Baninis
1/3 Cup Apple Sauce
Directions
SO simple!
Start with preheating your oven to 350
Throw it all together in a large mixing bowl and mix! I used an old fashion hand mixer (luckily my husband volunteered his muscles for this one, sadly he opted out of a photo) but if you have an electric one more power to you because this is a THICK batter!


Eat!

Subscribe to:
Posts (Atom)